An Inexpensive, Do-It-Yourself, Small Diameter Water Well

Having Problems? Need advice? Try the Water Well Helpline Message Board.

If you can drive a nail into a board, you have the skills to augment your water supply. Drilling companies charge thousands of dollars to tap ground water sources that you can often reach yourself with a few common tools and about two weekends of work.

Methods ranging from digging to blasting are used to reach the underground layer of fresh water that lies beneath dry land. Most of these are too technical, expensive, or dangerous for the average person. However, at the turn of the century the U.S. Army developed a fast, effective method to provide bivouacking troops with water that did not involve a lot of expensive, cumbersome equipment. Soldiers simply drove a pipe into the ground with a sledgehammer until they reached the aquifer. Subsequently, it has proven to be ideal for supplying water to homesteads, second homes, and remote villages in developing nations.

If driving a pipe 75 feet or so into the earth sounds like a job for Superman, I've given you the wrong impression. Too hard of a blow can damage pipe threads. It's better to soften the ground as much as possible before you begin. I recommend digging a hole at the site you've selected and allowing water to settle in it for a week. The softer the ground, the easier the work. A shallow hole (5 to 10 feet) is best because deep ones too often need reinforcement to prevent them from collapsing.

Choose a location as far as possible from septic tanks, sewer lines, chemical storage tanks, animal pens, and other potential contaminants. Check with county health officials concerning regulations and permit requirements. County officials have access to well logs and other geological data and can advise you as to subsurface composition (silt, sand, and decomposed granite are suitable for driven wells; hard clay or rock may prove difficult or impossible to penetrate), the approximate depth at which you can expect to find water, and the quality of the aquifer beneath your site.

You can also check with your neighbors. A weight on the end of a string dropped down a neighbor's well can give you a rough estimate of how far down you will have to go (measure to the point where the string becomes wet). Neighbors, particularly old-timers, can often give you some idea of what lies beneath the subsoil. If that doesn't work for you, pick a spot outside the drip line of a large hickory, walnut, butternut, white oak, or hornbeam tree that is not being irrigated. Since these types of trees have tap roots (maples, among others, do not), the fact that they are doing well without irrigation indicates that their tap roots are anchored in an aquifer. I live in a community where the street trees are immense despite the fact that they receive negligible rainfall and quite often aren't being irrigated. Common sense told me that the water table could not be more than 80 feet below the surface.

You'll need a 2-inch drivepoint with screen (a hollow, conically shaped metal point adjoined to a fine mesh screen), several spools of teflon tape, 2-inch galvanized couplings to attatch pipe lengths together, 5-foot-long threaded lengths of 2-inch galvanized Schedule 40 pipe, 2-inch galvanized caps for the pipe, concrete mix, a weight, a foot valve, and 85 feet of 1/2 inch inside diameter, thick-walled, flexible, UV resistant, flexible polyethylene tubing (I used Toro "funny pipe" irrigation tubing).

Dig a 5 foot deep pit, fill it with water, and allow the water to percolate into the ground so as to soften/lubricate the subsoil. Make sure the drivepoint is perpendicular to the ground—check it frequently with a level. If it is not straight, pull it out and start again. A slanted well wastes pipe and may be difficult to pump.

Use a heavy wooden mallet or maul to drive the capped galvanized pipe into the ground. wooden mallet/maul
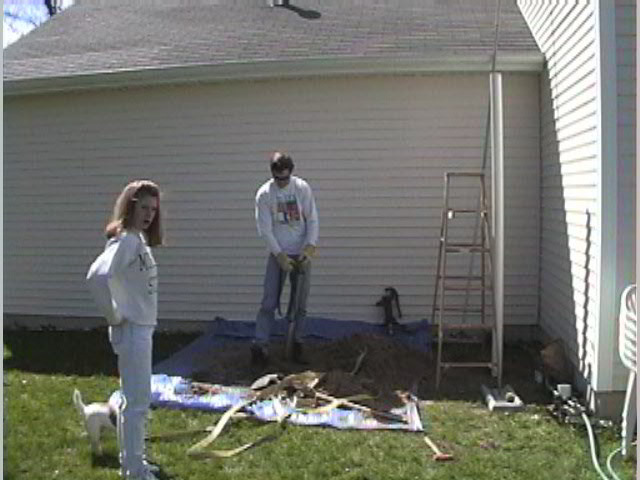
Hit the capped pipe as evenly as possible in the center of the cap and avoid side-to-side swaying of the pipe. A well-placed blow will make a dull sound rather than a ping. When the cap becomes cracked or dented, discard it and screw on a new one. Establish a steady rhythm and the work will go easier.  When the cap is about even with the bottom of the pit, unscrew it and screw on a coupling and a new length of pipe. Use teflon tape on the pipe threads, and make certain all connections are tightened securely with a pipe wrench. You may occasionally need to work from a step ladder in order to reach the cap with the maul.  When going through clay or shale, you may find it easier to use a sledgehammer, but be careful not to overdo it.

If the drivepoint hits a large rock, pull the point out and start again in a new location. To pull out the drivepoint, place two hydraulic automobile jacks on opposite sides of the pipe. Attatch a pipe clamp to the pipe for the jacks to lift against. Once the drivepoint lifts a few inches, it should be easy to remove.

When you believe you have reached water, tie a weight onto a length of string and lower it into the pipe. If it comes out wet, repeat the test several times over the next two days, and if the results are the same, you've found water. Drive the pipe down some more to compensate for seasonal fluctuations and periods of drought.


INSTRUCTIONS

The last step is adding a sanitary seal to prevent surface runoff from contaminating the aquifer. Lengthen the pipe to a height approximately 3 feet above the surface of the ground and fill the pit with the original soil. To protect your water supply and anchor your well, pour a small concrete slab into forms made of used 2-by-4's or 2-by-6's centered around the pipe at the surface. Install insulation around the pipes to protect your well from damage if the temperature where you live drops below freezing in winter.

Pitcher pumps like the one in the photograph at the beginning of this article are ideal for shallow wells. At depths greater than 25 feet, however, they stop working due to the limitations of atmospheric pressure. Inertia pumps (one-way footvalves attatched to flexible irrigation tubing) like the one in the next photograph are the simplest (they contain only one moving part) and least expensive (under $20) manual deep well pump.

driven well


If you have indoor plumbing or sprinklers, you will need a powered pump. Should the flow and/or pressure prove insufficient, you can either hook up multiple wells in series or install a storage tank. Inexpensive solar powered pumps are available, but I cannot vouch for their dependability.


Guide to Selection of Pumps for Water Wells


Stainless Steel Drivepoints
Stainless Steel Drivepoint Extensions
Illustration Depicting Driven Wells
Illustration And Installation Instructions For Drivepoint
Slotted PVC Drivepoints/Wellscreens
Chemical Free Iron Removal
Other Do-It-Yourself Methods
US Army Alternative Well Construction (FM 5-484)
Lifewater Canada, a non-profit organization with lots of how-to info on water wells
How to Jet (Wash Down) a Well
Activated Charcoal Cartridges for Removal of Sulfur/Rotten Egg Odors
Plans for Building a Heavy-Duty Drilling Rig
One Man Portable Drilling Rig
Spin-Down Filters That Eliminate Minerals and Don't Need to be Changed

Materials For Your Do-It-Yourself Water Well

one 2 inch diameter drivepoint with screen (from well supply dealer), $80
two spools teflon pipe thread tape, $2
fifteen 2-inch galvanized couplings, $68.70
fifteen 5-foot threaded lengths of 2-inch galvanized Schedule 40 pipe, $140
five 2-inch galvanized caps, $14.45
two bags concrete mix, $6
one 2-ounce weight, $1

TOTAL ESTIMATED COST: $316.15


NECESSARY TOOLS:

1 level
1 ladder
1 heavy wooden maul/mallet and/or sledgehammer
2 large (18 inch or greater) pipe wrenches

COMPANIES THAT SELL THESE MATERIALS:

An Inexpensive Do-It-Yourself Deep Well Pump

In 1991, I drove a 67 foot deep, 1 1/4 inch diameter well in my backyard.  To my utter dismay, they no longer made a pump that would fit this type of well.  I could either salvage a manual pump from an old well (a complicated assembly with a push rod and leathers) or come up with my own design.  Thus, the inertia pump was born of necessity.  Although it will pump any size of well, it works exceptionally well with 1 1/4 inch diameter deep wells and off-center or slanted wells.

Since inertia pumps contain only one moving part and are constructed from durable materials, they are extremely reliable.  They work in situations where more sophisticated pumps fail and do not lose their prime.  Inertia pumps are ideal for supplying campgrounds and cabins, bringing in new wells (nothing will cause a powered pump to seize up faster than pumping dirty water), or for emergency water in case there is a power outage.  Unfortunately, inertia pumps do not produce a sufficient rate of flow or enough water pressure to supply sprinkler systems and indoor plumbing.

You will need the following to build an inertia pump:  a 1/2 inch diameter solid brass or stainless steel ball salvaged from a ball bearing, a brass 1/2 inch male pipe threads by 1/2 inch inside diameter barb, a brass 1/2 inch female pipe threads by 1/2 inch brass tube fitting (discard insert, nut, and sleeve), and two 1/4L neoprene washers (all three fittings can be purchased at a nearby plumbing supplies retailer—total cost, approximately $5).  You will also need a 100 foot roll of 1/2 inch inside diameter, UV resistant tubing (available from the plumbing department at a warehouse building supplies retailer).

There are two types of brass 1/2 inch female pipe threads by 1/2 inch compression fittings—one has a flat inside and the other has a beveled inside.  In order for the solid metal ball to seat properly, the inside of the this compression fitting MUST be beveled.  Otherwise, it will not work.

Carefully enlarge the holes in the neoprene washers until they are 3/8 inch in diameter with a file or a rasp.  assembly of foot valve for inertia pumpPush the washers into the large end of the hose barb until they fit snugly (if they don't fit snugly, try using 3/8 or 3/8M washers).  Wrap the male pipe threads with teflon tape.  Place the 1/2 inch metal ball on top of the washers.  Next, screw the two brass fittings onto each other.  The device you put together is called a foot valve.  If you assembled it correctly, the metal ball will rattle when you shake the valve.

Because the only thing standard in brass plumbing fixtures are the threads, some adjustment may be necessary to achieve maximum flow.  Cut a foot long piece of tubing, rub the inside edge with vaseline, and push it gently onto the hose barb.  Next, grasp the top of the tubing while jerking the foot valve up and down in a bucket of water.  Count the number of strokes it takes before water flows out the top of the tubing.  Now, unscrew the foot valve by one full turn and repeat the experiment.  Try it again after removing one of the neoprene washers.  The fewer strokes it takes, the better the adjustment.

Foot valves are one way check valves that operate on the principle of inertia, allowing water to enter the 1/2 inch inside diameter tubing during the down stroke, but preventing it from draining back into the well on the up stroke.  Together, the valve and tubing form an inertia hand pump that requires little or no maintenance.  Should it ever become clogged with sand or silt, the foot valve easily screws apart for cleaning.   Using this system, it takes approximately 15 minutes labor to pump 5 gallons of water from a depth of 65 feet.

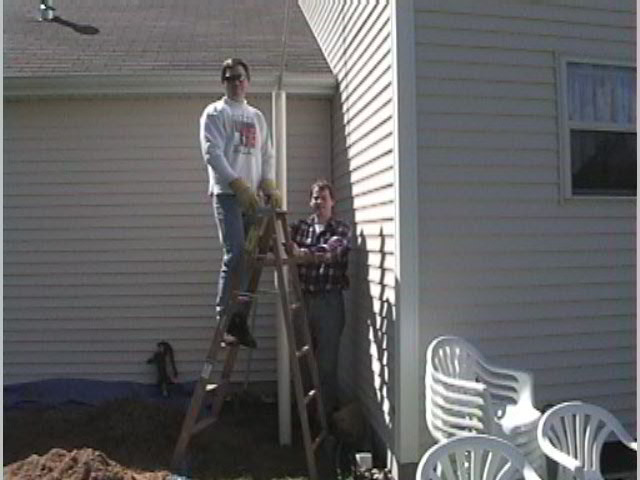
Now that you have adjusted the foot valve, it is time to assemble the inertia pump.  Shove one end of the tubing securely onto the barbed end of the foot valve.  If you have done this properly, it won't come off when you tug on it.  Your well should extend approximately two feet above ground level and should end in female threads.  If it ends in male threads, screw on a coupling.  Purchase a 1/2 inch galvanized bushing that is the same diameter as your well.  But before you screw it on, use a small rasp or a file to get rid of the 1/2 inch threads from the hexagonal end of the bushing.  Polish them smooth.  Now wrap the threads on the large end with teflon tape and stick the free end of the tubing through the 1/2 inch hole.  Lower the foot valve down the well and screw the galvanized bushing onto the female threads at the top of the well.  Next, drive a 2 inch by 3 or 4 inch wooden board into the ground 36 inches from the well.  Form a 7 to 8 foot loose loop (see photo of driven well) and attatch the tubing to the board with a 1/2 inch pipe clamp fastened with wood screws.  Detatch any excess tubing with a knife or a box cutter so that the end is high enough to place a bucket underneath.  Use a hose clamp to attatch a spigot (this keeps insects out of the well).

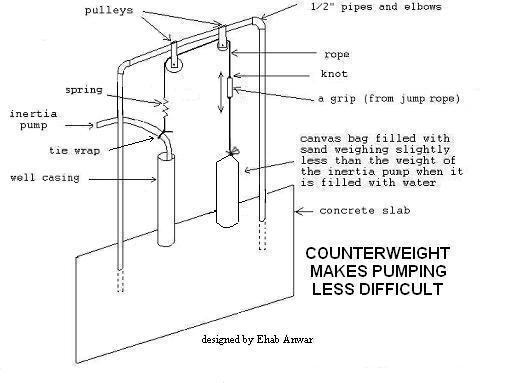
Using an inertia pump is akin to churning butter or clearing a drain with a plunger.  Imagine the well to be a batter's box and take a comfortable stance.   Reach out and grasp the tubing firmly in both hands at approximately the level of your waist.  Lift the foot valve off the bottom of the well and begin to jerk the tubing rapidly up and down, being careful to avoid contact between the foot valve and the bottom of the well.  At first, it might take as much as 200 strokes before water starts to flow from the open end of the tubing.  However, if there are no leaks, the inertia pump will remain primed and it should be easier the next time around.

Adding a counterweight connected to the inertia pump by a rope and two pulleys will make pumping less difficult. Use a canvas bag filled with sand for a counterweight and subtract sand until the bag weighs slightly less than the weight of the inertia pump when it contains water. Adjust the amount of sand in the bag until you can pull the bag down without difficulty and have it return to the up position when you let go.
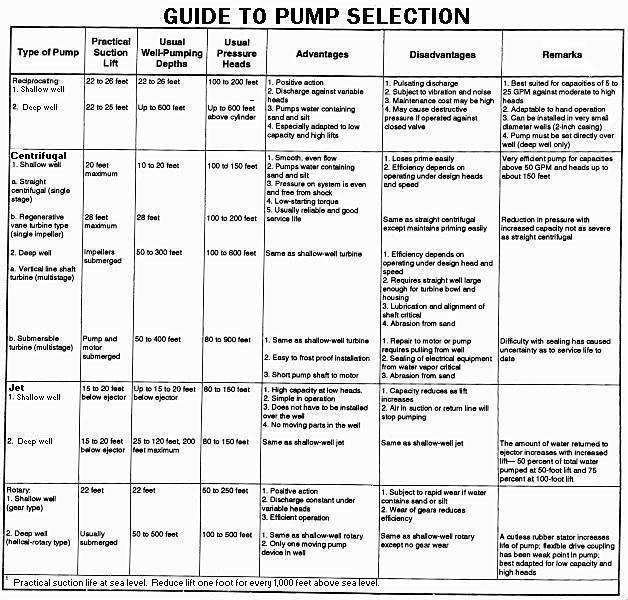
 

Jet Pumps

Jet Pump SetupA Jet pump is a combination of two pumps, the injector jet and a centrifugal (diffuser) pump that is used to draw water from wells into residences.  If the jet is located in the pump itself, it is known as a shallow well pump and will lift water up to about 25 feet.  If the jet is located down in the well below the water level, then it is a deep well pump and can lift water between 25 and 120 feet when installed properly.  Jet pumps utilize an impeller mounted on the drive shaft that spins and thrusts the water from the inlet to the outlet pipe similar to a centrifugal pump but at increased pressure.  At the inlet nozzle, before the water reaches the impeller, it passes through a venturi, which is a tapered constriction in the pipe.  As the water passes through this constriction, it builds pressure and the velocity of the water increases.  As the water is released into the widening section of the venturi, pressure drops, creating a suction effect at the constriction, and increasing the flow of water into the pipe.  A diffuser following the mixing chamber slows down the water and converts velocity head into pressure head.

Jet pumps are self-priming, have no moving parts and do not require lubrication.  Their efficiency is lower than that of a submersible pump (on average about 40 percent).  Jet pumps typically provide low rates of flow at high pressure.  Since the motors are above the water, jet pumps are easier to service than submersibles.


Pressure Tanks

If you can't take a shower and do the laundry at the same time without running out of water, you should think about getting a pressure tank.  The pressure tank fills at times when you are not using water and stores it for when you need it.  By having a tank of air pressurized to the level of your interior plumbing, you have a reserve of pressure that lets the water pump run less often. In the event of a power outage, you will be able to draw a few gallons of water before the system goes dry.  Also, the air in the tank cushions surges, resulting in a smoother flow of water from your fixtures.

There are two types of pressure tanks. Many older homes use a simple single-compartment tank which holds both air and water.  These tanks have a standard bicycle-type air valve for adding air.  Newer homes usually have a tank with an internal bladder. This bladder is like a balloon filled with air, which keeps air and water separate.  To find out if a bladder has gone bad, depress the inflation valve (it is usually located on the side of the tank somewhere near the top).  If water comes out, the bladder has ruptured and you will need to replace the tank.

With time, the air in a single-compartment tank will be absorbed by the water.  As the amount of air in the tank decreases, the tank looses its ability to hold pressure, and the well pump on-off cycle time decreases until the pump cycle causes surging at the fixtures.  This continuous running can potentially damage your pump and shorten its life.  Years worth of wear and tear can occur in a matter of days as your pump cycles on and off without letup while attempting to maintain pressure in your water system.

In order to recharge a bladderless well tank, the tank must be completely drained of water.  You may need to use an air compressor to blow the air out of the tank if your tank in below grade without a convenient drain.  Here is how to do it.  First turn off the well pump switch or flip the circuit breaker.  Then, turn on a spigot that is above the level of the tank to let the pressure out of the system.  Attach the compressor hose to the air valve on the pressure tank and pump air into it.  When air begins to come through the open spigot, detatch the compressor.  Turn on your well pump and the tank will be automatically pressurized.  Close the faucet after the air is exhausted from the system.  You may experience sudden spurts of air from faucets and toilets for a short time as the system relieves itself of air introduced by the partial draining of the system.

If you have a bladder-type tank, the tank should be pre-pressurized to two pounds above the low pressure setting on your pump.  To adjust the pressure in a bladder-type tank, decide on the low pressure you want for your system (usually around 30 psi) and add or subtract air via the inflation valve.
Water Pressure

Your pump determines your water pressure.  New homes have to meet certain guidelines with regards to pressure and flow.  Your indoor plumbing should be 3/4" minimum until the point where it branches off to the fixture at which point 1/2" is permitted.  Usually there is a discharge/shutoff valve just after the pressure tank.  Most new homes come with a 30/50 pressure switch, which means the pump turns on when the pressure in the tank reaches 30 psi, and turns off when the pressure reaches 50 psi.  If you feel you need more pressure, turn off the circuit breaker, take the cover off the switch, and then use a wrench to tighten the large nut (which compresses the spring) until the pump reaches a 40/60 on/off ratio as shown by the pressure gauge. If you attempt to set it any higher than 60, you do so at your own risk.


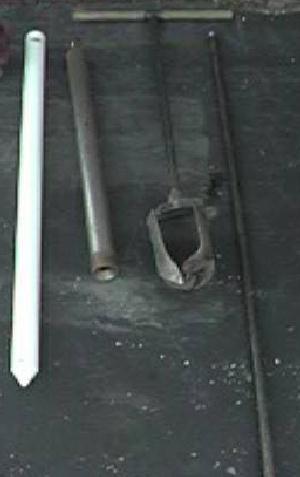
How to Make a Drivepoint from Pipe

You can make a drivepoint from pipe.  Here is how:

FORMING POINT ON END OF PIPE


1.  Flatten the end of the pipe to a gradual taper similar to the working end of a cold chisel.
2.  Cut a V-shaped notch out of the flattened end.
3.  Bring the two points together to form a single point.
4.  Weld the two sides of the point together.
5.  File off any burrs or irregularities.

Alternatively, a point may be cast from iron and welded to the end of pipe.  It should have an edge on the back of the point which butts securely against the end of the pipe.  So as to prevent damage to the pipe couplings, make the largest diameter of the point greater than that of the pipe couplings.

SLOTS, HOLES, AND CAST POINTS


To make the wellscreen, either drill holes of the desired screen size (if you aren't sure what size you need, 1/100 inch will screen out sand) or by making a series of short diagonal hacksaw cuts.  When you make the openings, keep in mind that strength must be retained in the pipe or it won't withstand driving.  This can best be assured, in the case of the saw cuts, by leaving several longitudinal strips unperforated.  An alternative method would be to cut larger openings and then cover them with wire mesh of the desired screen size soldered around the pipe.  The screening should be protected from being slit or stripped back when the point is driven into the ground.  You can do this by (a) wrapping and soldering sheet metal with coarse perforations around the screening and (b) making it so that either the point or a collar attached to the pipe below the screen will have an outside diameter greater than the outside diameter of the screening.


HOMEMADE DRIVEPOINT


New Life for Old Wells

Nothing is more frustrating than having a well go dry.  Usually, all it would take to make your well good again is to go ten or fifteen feet deeper, but most drillers prefer to drill a new well which can easily cost a month's wages or more.

This is where a drivepoint can save the day.  Given the proper conditions, you can lower a drivepoint (also called a sandpoint or a wellpoint, depending on where you are from) to the bottom of a dry cased well and drive it down until you hit water.  Chances are you won't have to go very far.

Each well, of course, is different.  But here is how Dennis Meyer went about it on some lakeshore property he bought in Brainerd, Minnesota:

"This property came with a cabin and a well and is near another cabin we had owned for some time.  The well consisted of a stand pump, a nice 4Ό” inside diameter casing, and a 1Ό" x 3' sandpoint below the casing.  It had a 3” lift cylinder down about 25’ inside the casing and the previous owner said that the water table was about 37’ below the surface.  The casing had been installed by the previous owner in an attempt to get the point and lift cylinder down as far as possible in order to get better water.

With the addition of a pumpjack, this well supplied water for about 20 years, however, the water volume had recently gotten quite low.  Because this was a spare cabin that we use merely for extra sleeping space I really didn’t need to put in pressurized water.   However, my ever-lovin’ wife thought I could rig something better than an outside pump.  Being an electrical engineer (a real handicap here) and not knowing much about water wells, I had to resurrect my old hydrology class books, study them, talk to some experts, and then see what I could do.  I started by pulling up the old point/pipe assembly with the three-point lift on my tractor and noted that the 3' point had been down approximately 41' and was heavily encrusted with calcium and magnesium—an indication of hard water.  I determined that the 4Ό” i.d. casing went down exactly 34’.  The lake is 110’ from the well, the lake surface is 37’ below the top of the well, and the well is 1190’ above sea level.  With this information, I determined that the longest distance that water could be lifted by suction would be 23', which would not be enough for my needs.

I gave it some thought and decided I would create a hybrid well, consisting of a convertible two-pipe jet pump with the injector/jet located at the bottom of the casing and driven tail pipes, a check valve, and a 5' long, 1Ό” sandpoint below the jet.New Life for an Old Well  I would then connect the injector to the pump at the surface.  Since I was planning to lower the sandpoint, tail pipes, check valve, and injector, with pressure pipe completely assembled into the casing, I decided to use only high quality components that I was sure would withstand the driving.  I wanted to get the jet as close to the water table as I could to minimize lift and maximize flow.  I also wanted to use 1Ό” rather than 2” pipe so that I could drive it as far as possible in hopes of getting the soft water we had at the other cabin nearby.  For my purposes, water quality was more important than quantity.

The trick here was to be able to drive the entire assembly down to where I thought there was soft water without damaging or breaking something and that’s where the driver comes in.  I found a well-made post driver at an auction.  It was made from 3½” stainless pipe with a 7/16” thick wall and it was 40” long.  It had two nice 1” diameter handles parallel to the driver, each about 12” long, one on each side and a Ύ” thick plate welded just inside the top.  This driver looks as if it was professionally made for heavy-duty post driving, however, it would be relatively easy to make one.  I melted about 12” of plumbers lead inside the top of the driver.  The lead is the key in that it yields a nice soft blow to preclude damage to the whole assembly.  The same amount of energy is delivered to the leaded pipe that a non-leaded driver of the same weight would deliver, it’s just that the energy is spread out over a longer period of time.  As far as the pipe threads, the check valve, and the injector are concerned, it is better to limit the shock from the blows as much as possible.   A word of caution is in order.  Since lead is known to be toxic, you should be careful not to let any lead drop into the well.

In order to assure that I had good strong joints, I began by assembling the drivepoint, the tail pipes, the check valve, the injector, and the pressure pipe at the surface using Teflon tape.  For added strength, I used drive couplings.  Of course, I was careful not to get any foreign material into the system that might plug up the jet.  I lowered this assembly down into the casing using clamps made from 5/16" x 1Ό” strap steel and 3/8" bolts to fasten the straps to either side of the pipe.  Being careful not to let it drop, I lowered the assembly into the casing and, when the injector/jet with a clamp below it rested on the top of the casing, I added 10' sections of Schedule 40 galvanized pipe above the jet until the point reached sand at 35'.  I was then able to drive the whole assembly, adding 1Ό” pipe as needed until the drivepoint reached a depth of 50’.  Even though I had a 35' head start and the able assistance of my friend, Hugh McMillan, it took time and patience to get the assembled components to a depth of 50' without shaking something loose.

From bottom up, starting at 50’, I have the following:  5’ stainless steel drivepoint, 5’ section of galvanized pipe, stainless steel check valve, 5’ section of galvnaized pipe, in-line injector with 20-90’ depth nozzle and venturi.  [The injector lies near the bottom of the casing.]  Then there is 35’ of 1" Schedule 40 PVC pressure pipe, and 35’ of Schedule 40 galvanized steel suction pipe (three 10’ sections and one 5’ section).  The plastic pipe and the 1Ό” galvanized pipe continue up through the casing and connect with the ½ hp pump near the surface.  I used a Red Lion injector becuase it puts the tail and riser pipes in-line to avoid damage during driving and they are also quite tough.  The pump is a ½ horsepower Red Lion.  Both pump and injector are made by Monarch Industries in Winnipeg, Manitoba, and can be purchased at farm and ranch supply stores.  Drive couplings and a stainless steel check valve are sold by plumbing stores and/or well supplies dealers.

I talked to several well drillers and pump experts before I started and none of them had ever heard of anyone doing this but thought it would work and encouraged me to try.  I tried it and this setup really works."
Dennis says that he would not recommend this method for everyone since it involves preassembling the components on the surface before they are put into the well.  I might add that this should never be attempted in rocky soils or on water wells that are extremely deep..

A drivepoint can also be used to rehabilitate a dug well.  Lower the drivepoint to the bottom of the well and brace the galvanized pipe at the top with timbers.  When you have finished, make a sturdy cover to keep contaminants out.


Dug Wells


You can't get much simpler than a dug well.  It is little more than a hole in the ground.  When lined with brick, stone, sewer pipe, or some other impervious material, the section that is below the groundwater level should have openings to permit water to enter from the aquifer.  To avoid contamination from surface runoff, the walls of the well should extend above the surface and a cover or roof should be added.

A dug well actually has a few advantages over other types of wells.  Only simple hand tools—a pick and a shovel—are required.  Also, the well acts as its own reservoir, eliminating the need for a storage tank.  Since the diameter is larger than other types of wells, the flow rate will be greater (for every 100 percent increase in the diameter of a well, the amount of water entering the well at any given moment—the rate of flow—will increase by approximately ten percent).

Even experienced construction workers are sometimes trapped when the walls of an excavation collapse.  For safety's sake, never enter a hole deeper than your waist without bracing the sides.  One of the easiest and least expensive ways of shoring up a well is to use concrete sewer pipe.  Choose a diameter that will allow you to swing a pick from the inside without hitting the walls.  Place the first section upright on the ground where you want the well.  You will need two ladders—one to climb to the top of the pipe and the other to get to the bottom.   Use the shovel to undermine the pipe.  As you clear away the dirt from beneath the pipe, its considerable weight will cause it to settle.  This works best if you dig a few inches beyond the outer edge of the pipe.  Be careful—don't ever put your feet or fingers beneath the pipe.  The more you dig, the farther it will sink.  When the top of the pipe is even with the ground, slide another section of pipe on top.  Keep this up until you reach water, then go down several more feet to compensate for seasonal fluctuations in the water table.  Cut a few openings in the bottom section of pipe to enable groundwater to enter your well.  The final step is to pack the last foot or so of the well with a thin layer of stones and pebbles followed by a thick layer of gravel.

Disposing of the dirt can be a problem.  Hauling dirt up with a bucket on a rope is hard labor.  Fashion a temporary tripod with a pulley at the top of the well and you will make faster progress.  The volume of dirt you will have to haul away is liable to be greater than you would guess.


Biblical Step WellDug wells have been around since ancient times. The Old Testament twice mentions the well of Bethlehem, located by the city gate (Samuel 23:15 and 1 Chronicles 11:17).  Many of these wells—some of which are still in use today—were dug at an incline with wide, elongated stone steps leading gently down to an underground chamber at the bottom of which there was a subterranean pool of water.  Jars and pitchers were filled with water at the edge of the pool and balanced on the head on the way up.  Such wells are only practical in arid climates where there is not much risk of contamination from surface runoff.

Augured Wells


Augering a well resembles boring a hole in wood or laminate with a drill.  As it rotates, the cutting edge of the auger shaves off a small piece of soil which feeds upward and is emptied when you remove the auger from the hole.  There are both small diameter hand augers and large diameter powered augers.  Auger attatchments are available for backhoes, tractors, and excavators.   By utilizing extensions, it is possible to bore down to the water table in almost any strata with the exception of bedrock.  This type of well has to be cased with a pipe that is smaller than the hole.  Sand, silt, and decomposed granite are unlikely candidates for augering because the hole tends to collapse when the auger is extracted.  Once the water table is reached, some other method—such as a drivepoint—has to be used to get any deeper since it is impossible to bore a sustainable hole in saturated soil.

In addition to helical augers, there are various other types of earth augers such as the bucket auger (more commonly known as a post hole digger) and the tubular auger, which consists of a long hollow slotted pipe with teeth cut into the bottom end.  A tubular auger has to be shoved into the ground on the end of a rod and twisted in order to accomplish its task.  This kind of auger works well in almost any sort of clay.


Sprinkler Systems

Sprinker Pump Installation
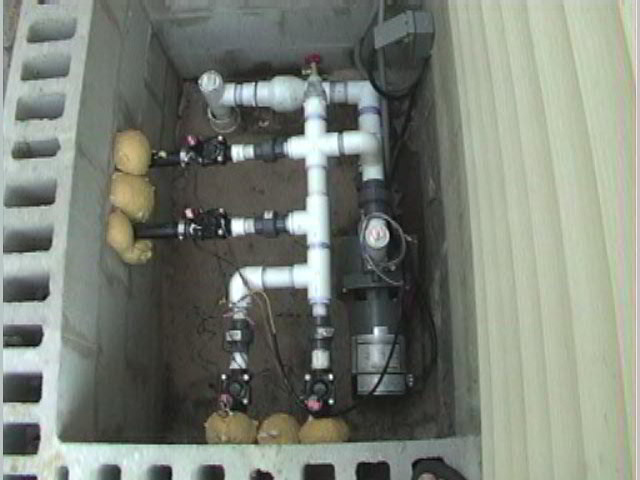
If you have municipal water and your monthly bill is more than you can afford to pay, you might want to consider switching to a drivepoint for your irrigation water. Where I live (Riverside County in Southern California), the county charges less for irrigation well permits than it does for potable water permits. Vegetable gardens, trees, flowering plants, and lawns often thrive on water that is less than pristine. Most sprinklers require at least 40 psi. The more pressure you can develop, the better. If you have a lot of sprinklers, you will need to build a manifold and purchase a station timer. Install a check valve just before the pump. This will prevent the water from draining back into the well when the pump is off. If the output of the pump is less than the volume of water required to run the sprinklers, a big enough pressure tank will make up the difference. Subtract the gallons of water that the pump produces from the number of gallons required by your sprinklers and the remainder is how big your tank should be.


Developing Your Well


Remove sand or dirt within the well by lowering a garden hose to the bottom of the well and flushing it with water. A high-velocity stream of water loosens dirt that has become imbedded in the screen during the process of driving the point and washes the finer particles upward and out of the pipe. Backwashing under pressure may help to increase the flow of water into the well.

To cleanse your well of any particles that remain, use a foot valve at the bottom end of a long length of polyethylene tubing (it's called an inertia pump) to manually pump the water until it is silt free. The foot valve (a heavy-duty brass valve can be ordered from the author by clicking on the order button below this text) is a one-way check valve that allows water to enter the tubing as it is manually jerked up and down. Since water cannot be compressed, the water level within the tubing rises with each stroke until it exits at the top. Because even miniscule grains of sand can cause pump burnout, it is best not to use an electrically powered pump to perform this task.

Although the inertia pump cannot provide sufficient volume and pressure to operate household plumbing, its low cost, durability, and ease of maintenance make it an ideal choice wherever low pressure and volume will not pose a problem.

Ordinary vacuum pumps will not work with wells deeper than 25 feet due to the limitations of atmospheric pressure. Electrical deep-well pumps are available in cylinder, jet, and submersible types. Used or rebuilt pumps can be obtained for a fraction of the cost of a new pump. Since each well has unique characteristics which can greatly influence your choice, it is often best to wait until after the well is completed to purchase a pump.

A professional driller puts a handful of chlorine tablets in each new well to kill bacteria introduced into the aquifer during penetration. A half gallon of ordinary household bleach is the liquid equivalent and is less expensive. Pump the well immediately until the chlorine smell and taste vanishes.

If your well's volume of water is too small for your needs, two or more driven wells can be connected in a series. Adding a storage tank to your system will also help to increase its efficiency during periods of peak demand.


Testing Your Well


Commercial laboratory testing is expensive, but is advisable if your well is going to be your primary source of potable (drinking) water.  However, if your well is going to be used for agricultural or irrigation purposes, there are cheaper methods to determine its worth.  Acidity and alkalinity tests can be done with litmus paper or kits bought from a pool supplier.  A drop of well water placed on agar in a petri dish and incubated may indicate the presence or absence of bacteria.  Keeping a male beta (Siamese fighting fish) in a bowl of well water is a colorful way to test its quality.

Common sense is perhaps the best test of all.  How clear does it look?  Does it have an odor?  Rotten egg taste denotes sulfer (which can be substantially reduced by aeration and piping the water through a canister filled with activated charcoal).  Salinity can also be tasted.  Hard water (i.e. water containing a substantial amount of dissolved minerals) leaves a ring around containers and deposits on fixtures.  My two Labradors actually prefer water from our well to water from the city system (most likely due to the absence of chlorine).

Water Pik makes filtration devices for home use.  They remove impurities, improve taste, and eliminate odors.

If you have any doubts concerning the quality of your water, I suggest you drink and cook with bottled water until the problem is resolved.


Questions & Answers About Driving a Well
(more at http://www.voy.com/102731/)
From: the Ouellettes
To: fdungan@fdungan.com
Sent: Sunday, December 09, 2007 7:02 AM
Subject: point size

Howdy,

I don't know if this address is still active since most of the emails I read on your site were at least 5 years old. But, here goes: Is there any advantage in using a 2 inch well point over a 1 1/2 inch point? I am considering moving my point well and was wondering if the flow from a 2 inch well would be greater than from a 1 1/2 in well. I will be using a bladder tank with a 3/4 hp shallow well jet pump. Also, is it acceptable to use the black pvc pipe to make the run from the pump and is it okay to locate the pump in the basement which will be located some distance from the well? I know that is quite a mouthful, but it is the middle of winter and have lots of time to plan.

Thanks, Barney


From: Fred Dungan
To: the Ouellettes
Sent: Sunday, December 09, 2007 4:52 PM
Subject: Re: point size

Barney,

The black ABS pipe is for wastewater and is not made to withstand pressure. If you want to use something other than PVC, you could always go with flexible poly. For a shallow well, there is not much difference between 1 1/2 inch and 2 inch diameter drivepoints (4% increase in rate of flow). If you are still in the planning stage, why not put the well in the basement? The concrete slab is not going to get hurt if you do it right. There is no better place than a basement for a well because:

1. It won't freeze.
2. You are already 8 feet below the surface when you start.
3. You don't have to go outside to work on it.
4. It lowers the water table and will actually help to prevent moisture damage to your basement.
5. No need for a sump pump.

The emails are 5 years old because of privacy concerns. If everyone who wrote to me for advice was deluged by a flood of emails, they might hesitate to write me again. This has happened several times and I have had to revamp my website because of it. The only other way would be to disguise the names and redact the addresses which would make it look like I concocted the emails.

Sincerely,

Fred Dungan


From: Ronald_Fitch@SSGA.COM
To: fdungan@fdungan.com
Subject: Driving a well
Date: Monday, October 08, 2001 9:32 AM


Fred,

I read with great interest your article about driving a well. I am trying to do the same. Following your instructions, I am at the point of "driving" the well point. However, at my age, and the fact I sit behind a desk all day, swinging a sledge hammer is taking it's toll on my whole body. I have heard about devices that have drive weights attached to a pulley(s) on a tripod. I checked with several local rental and suppliers, and have been told the well drilling industry has forced Dig Safe to ban the use of these devices in Massachusetts. Do you have any idea where I might be able to beg, borrow, or steal (buy) something like this? The well is going to be used for lawn irrigation.

Any help would be greatly appreciated.

Thanks,

Ron


From: fdungan@fdungan.com
To: Ronald_Fitch@SSGA.COM
Subject: Re: Driving a well
Date: Monday, October 08, 2001 7:53 PM


Dear Ron,

As I said at the beginning of the article, driving a well is not a job for Superman. Accuracy of blows is much more important than strength. Taking a full swing isn't really necessary or, for that matter, desirable since misplaced heavy pounding can damage the pipe threads. This isn't a carnival game, you don't have to ring the bell to win, and there is no cigar or kewpie doll for doing so.

If you don't feel up to it, why not hire some young, muscular guy to do it for you? Where I live, we have many recent immigrants who earn their living by doing this type of labor and they are, for the most part, grateful for the work.

Makeshift tripods were commonly used to drive wells in the early part of the 20th century. The fact that they are no longer popular should tell you that they are risky.

Sincerely,

Fred Dungan


From: Kurt Mueller
To: fdungan@fdungan.com
Sent: Friday, September 19, 2003 9:08 AM
Subject:removing

Fred,

Your site is interesting and informative.  Here a little story and some request for suggestions on a problem I have encountered.

First a little history.....I live in northeastern Wisconsin and have some land on a lake further north.  Sandpoint wells are common around my neighborhood up there and I've had a fair amount of experience putting wells in.  Most of the wells are about 28 to 33 feet deep and flow as artesian.  The ground is mostly a combination of clays with some sand and, of course, rock.

We use a tripod/pulley method with a custom 75 pound weight and guide shaft that rides inside the pipe.  I recently have begun driving a new well and have had some bad luck as I'm now on the fourth spot after failing on the other three attempts.  The three failures primarily were caused by running into some rock??? and then breaking the pipe at various depths either during the driving or during the removal process leaving the point in the ground$$$$.  For removing pipe I have constructed a custom yoke consisting of 4 inch square steel tubing about two feet long.  On one side of the tube I have welded a 3/8 x 4 x 6 inch steel plate in the middle.  Through the middle of the plate and hence the walls of the tube I bored a 1 1/4 inch hole that fits snuggly over a standard 1 1/4 drive pipe.  I place this over the pipe and then install a coupling or cap.  Using large railroad tie sections as bases I then use hydraulic bottle jacks to apply pressure.  You may asked why construct this yoke when you could use the method you described of a using a pipe clamp.  We have found that the gripping power is insufficient and will slide on the pipe as we have to typically apply quite a bit more pressure to extract the pipes through our clay/rock soil.  In fact I currently have a two inch, seven foot section of pipe with the three foot standard sandpoint in the ground that will not move down or up!...only ten feet down!

Anyway that's another days project as I've since moved on to another site and have ~34 feet of 1 1/4 drive pipe down.   At this point it does not want to go down anymore.  We have had some water at about 24 feet but it could not be sustained with a hand pump so we continued to drive to get where we are now.  According to history on the neighbors sites we have experienced very similar conditions...hit a hard layer about 22 feet (we did and went through)...hit another hard layer roughly 28-32 feet ...(which we did) and through this we should then find the artesian layer.  My dilemma is that we cannot get any more forward progress with the driving and we think that the point has collapsed to some degree, probably in the process of driving thought the second hard layer.  We have verified that we have continuous unbroken pipe to about 30 feet by dropping a string and bolt as well as snaking a garden hose down.  Throughout the driving process, particularly in area where we suspect water may be, we would install a hand pump and try to pull water.  At this point, just as we did at about 24 feet we can get a little water up but now quite a bit of sand comes along with it.  Bummer!!...this is what leads us to believe we have broken the sand point in some fashion.  We think it would be best to pull the whole thing and inspect the point for damage.  We have taken one crack at it with the yoke I described earlier but twice broke off the top pipe.  We did not have enough of the drive pipe exposed so we added a two foot piece of standard pipe, not drive pipe.

Tomorrow we are going to try again using a drive pipe for the two foot piece as well as incorporating some induced vibration on the well pipe via a electric impact wrench.  We will apply this method to the other site as well (two inch ten foot pipe).

Do you have any other suggestions on the removal process?

Kurt

P.S. Sorry for the rambling.


From: Fred Dungan

To: Kurt.Mueller@plexus.com
Sent: Friday, September 19, 2003 7:38 PM
Subject: Re: removing

Kurt,

I see it a bit differently.  Instead of working on a better way to remove the drivepoint, I would first work on a way to prevent the pipe from breaking.  I agree with you that the problem is most likely that you are running into rocks.  When the drivepoint comes into contact with a rock, it makes a different sound—sort of a dull thud rather than the usual ping.  Also, it doesn't go down.  When you hear the dull thud and see it isn't going down, stop immediately.  Failure to do so can cost you hundreds of dollars in equipment.  But don't abandon the hole.  Use an auger with an extension to turn the stone, then reinsert the drivepoint and continue.  Are you using drivepoints with cast iron tips?  If not, Supermike (his email identity) at Utica Pump Company in Utica, NY tells me they sell for $52 each (plus shipping).  Where are the breaks occuring?   Are they in the pipe or in the couplings?  If the breaks are occuring at the couplings put a collar on the drivepoint.  A collar expands the hole a little bit which keeps the fittings from catching on the edges of the hole.   If the pipe breaks just below the surface, it is not always necessary for you to pull the point.  Dig a hole and expose the broken end of the pipe.  Clean the end and file off any burrs.  A section of 1 1/2 inch Schedule 40 galvanized pipe should fit snugly over a broken 1 1/4 inch Schedule 40 galvanized pipe. There are a number of ways to join them together.  If you choose to arc weld, be careful because the fumes can be toxic.

Sincerely,

Fred Dungan


----- Original Message -----
From:  "El Lobito"
To:  fdungan@fdungan.com
Sent:  Tuesday, January 29, 2002 12:24 AM
Subject:  Sandpoint well.

Hi Fred,

I came across your site by miracle.  I haven't had much luck in finding any information about sandpoint wells.  My parents' home has a sandpoint well and it seems like it may of gone dry.  I am planning to see how difficult it is to install another sandpoint well myself.  I just wanted to take the time out to thank you for making this information available.  I was wondering if there are any more tips or things I should take into consideration with a sandpoint well.  I will point out that is the only source of water for my parents' home.

Thanks for your time.

Cuco Anaya
el_lobito@onebox.com - email


From:  Fred Dungan
To:  El Lobito
Sent:  Tuesday, January 29, 2002 5:35 PM
Subject:  Re: Sandpoint well.

Cuco,

As a writer, I've had to learn how to get by on a shoestring budget.  If it were my well and it went dry, I would get out my hammer and drive it a few feet deeper.  Of course, there is a chance that it won't go any deeper or that the wellscreen will be damaged.  But that is what I would do before going to the expense of putting in a new well.  What have you got to lose?

Best regards,
Fred


From:  Tim Howard
To:  Fred Dungan
Sent:  Tuesday, February 05, 2002 8:53 AM
Subject:  RE: Wellscreens:

Fred,

    Sorry about yet another intrusion, but when it comes to screen "opening" (mesh size), I'm assuming that smaller is better in that fewer particles get in the pipe.  Is this accurate?

Thanks,
TJH

From: Fred Dungan
To: Tim Howard
Sent:  Tuesday, February 05, 2002 6:20 PM
Subject:  Re: Wellscreens

Dear Tim,

It is never an intrusion.  This is what I do.

The size of particles varies with the aquifer.  Where I live the subsoil is decomposed granite down to the bedrock—particles larger than a grain of sand.  But if you expect to encounter grit or silt, it is best to go with a fine mesh.  The larger particles in the aquifer lodge up against the wellscreen and act as a barrier to smaller particles.  What this means is that the more a well is pumped, the cleaner the water gets.

But that really wasn't a direct answer, was it?  That's because one is never absolutely certain what size mesh to use, but when in doubt, the odds are better if you go with a fine mesh.  The biggest problem with fine mesh is that as it corrodes, the flow reduces.  That is why I recommend going with a stainless steel wellscreen (brass is second best).

Sincerely,

Fred Dungan


From: Peter Schmied
To: fdungan@fdungan.com
Sent: Monday, March 04, 2002 6:54 PM
Subject: Well question (from your article)

Fred,

What function does the polyethylene tubing serve, and what do you hook up to each end?

Your article was a great resource for me, thanks a lot.

Peter Schmied
Florida


From: Fred Dungan
To: Peter Schmied
Sent: Monday, March 04, 2002 8:37 PM
Subject: Re: Well question (from your article)

Dear Peter,

Thanks for reminding me that I need to alter my website to indicate that the tubing is optional.  The next time you visit you will find the changes have been made.

The tubing, when attatched at one end to a foot valve, constitutes the simplest (only one moving part) and most reliable (I've used it every day for 11 years), manual water pump for BOTH shallow and deep small diameter water wells.  It's called an inertia pump and the best part about it is that it is foolproof.  Even when exposed to direct sunlight (I live on the edge of the Mojave Desert where it is not unusual for the temperature to soar above 110 degrees in summer) and subjected to sand and muck that would cause most pumps to fail, it keeps on pumping.  However, being manually operated, it requires sweat equity and is not for everyone.

My original intention was to design an inexpensive method (under $500) of obtaining groundwater at depths of up to 80 feet for use in underdeveloped nations.  The idea was to make it so simple that local labor could be utilized for installation and so durable that it would not require any maintenance.  I succeeded far beyond my wildest dreams.  However, when I attempted to give it to the United Nations for free, I ran up against a consortium of drilling interests who did not appreciate me interfering with their lucrative contracts.

You most likely have access to electricity and would prefer the convenience of a powered pump.   However, if you have any difficulty in clearing sand and dirt from a new well, you might consider using an inertia pump, as they are faster, cheaper, and infinitely more reliable than the bladders and bailers that are currently being used for this purpose.

Sincerely,

Fred Dungan


From: Nord, Russ (MED, LUNAR)
To: fdungan@fdungan.com
Sent: Tuesday, May 28, 2002 2:02 PM
Subject: Well (what else?)

Fred,

I just found your website and read thru it with a great deal of interest. Especially the question and answer section. You may be able to help me decide what to do with my home well.

I don't want to make a new well, I want to recondition the one we have. It's somewhere on the order of 50 years old, a driven sand point according to the man who built the house. It's in our basement and goes down only 15 feet below the floor, again according to the builder. The problem is that it's gotten very slow. I don't think the water table has changed, so I assume that the point has clogged up. I've heard of reconditioning a well by dropping in some kind of acid tablets; I've heard of pumping water in and out to re-position the sand grains; I've even heard of “shooting” a well with a .22 rifle. What words of wisdom do you have on this?

Russ Nord
Ft. Atkinson, WI


From: Fred Dungan
To: Nord, Russ (MED, LUNAR)
Sent: Wednesday, May 29, 2002 9:35 PM
Subject: Re: Well (what else?)

Russ,

I would rate the risk in the following ascending order:
1. compressed air
2. chemicals
3. bullet
Let's take a worse-case scenario and say that you somehow put a large hole in the well screen. At least it is no longer clogged. Drop a smaller diameter Schedule 40 pipe with an inexpensive PVC drivepoint on one end down the inside of your well and you will have a slightly smaller, but more efficient well. However, this is a last resort. I would first try the compressed air and the acid.

As for the bullet....

Sincerely,

Fred Dungan


From: Hebert, Tim
To: fdungan@fdungan.com
Sent: Tuesday, March 26, 2002 7:39 AM
Subject: Well Pump Testing

Dear Fred,

I am purchasing a home with a well.  I would like to know how I can test the gpm's on my own without hiring a contractor.

Regards,
Tim Hebert


From: Fred Dungan
To: Hebert, Tim
Sent: Tuesday, March 26, 2002 5:23 PM
Subject: Re: Well Pump Testing

Tim,

Get yourself several 5 or 10 gallon containers.  Run the pump full blast for 2 minutes and fill the containers with the water.  Use the second hand on your watch to mark the time.  When done, count up the number of gallons that you have and divide by two.  This will give you a rough estimate of gallons per minute.  However, when evaluating the quality of a well, most people consider the recovery rate to be every bit as important as the rate of flow.  Recovery rate is how long it takes the well to come back up to the normal level when you pump it down.  You might also want to evaluate the quality of the water.  Does it smell funny?  How does it taste?  If in doubt, you can send a sample to a laboratory.  I would also check around the plumbing fixtures inside the house.  Are there heavy mineral deposits or stains?  If so, you might want to ask the seller to take into consideration that you will need to purchase a water softener.

Best regards,

Fred Dungan


From:  "Allen Borlaug"
To:  "Fred Dungan"
Sent:  Monday, April 22, 2002 4:31 PM
Subject:  Well location

Dear Fred,
I was in luck and found your article on the net.  I just bought a piece of proprerty in north Iowa and hope to install a sand point well.  A new drilled well was just put in across the road from my property and the log of well is as follows:

    0' to 9' topsoil, brown clay
    9' to 20' Blue clay
    20' to 45' Sandy blue clay
    45'to 83' Blue clay
    83' to 85' Limerock
    85' to 101' Shale
    101' to 118' Limerock
    118' to 120' Shale

What kind of educated guess could you give me at the chances of finding water based on this log?  There is a sandpoint well that has worked well about 1/4 mile down the road on the other side of a small stream.

Thank you for your trouble.

Sincerley yours,

Allen Borlaug


From:  Fred Dungan
To:  senatorb@powerbank.net
Sent:  Monday, April 22, 2002 7:37 PM
Subject:  Re: Well location

Dear Allen,

You are obviously one of those rare individuals who take the time and trouble to do the research before embarking upon a project.  The well log definitely tells a tale from which you may benefit.

Let's begin with a bit of inside info on the business of drilling.  It is standard practice in the drilling industry to go down at least 100 feet regardless of how much water may be bypassed at a shallower depth.  The purpose of this is twofold—#1 it helps to justify the enormous cost (because the drilling rig costs upwards of $100,000, the contractor often charges thousands of dollars simply to set up his equipment at the site) and #2 the deeper the well, the less chance that it will go dry during seasonal fluctuations or droughts.

Now, let's move on to an analysis of the well log.  I am surprised that the contractor did not note the depths and flow rates of any water encountered at shallower depths.  Of course, it is possible (but not likely) that he did not encounter water until he reached the second layer of shale.  But if he did, it would have been on top of the blue clay or limerock.  I suggest that you go visit the sand point well and find out how deep it is as there is a good chance that you will find water at about the same level on your property.  Don't attempt to punch through blue clay or limerock with a drivepoint as such strata is almost impossible to penetrate without a drilling rig.

Wishing you success,

Fred Dungan


From: Martin, Michael D MMC(SS) (CSS16 N405) MartinMD@css16.navy.mil
To: fdungan@fdungan.com
Sent: Tuesday, April 29, 2003 11:57 AM
Subject: Wells

Mr. Dungan,

I sent you an E mail on the website but I wasn't sure it went thru. I passed a little history on but let me cry on your shoulder some more. I am a Senior Chief in the USN ( Sorry ) I see how proud you are on your son, I hope this fiinds him well. I have a home in the hills of North Ga and have been having a heck of a time keeping my wife happy and at 10$ a foot things are getting pricey. As I said I have had 3 drilled on 5 acres, closest is appx 200 apart farthest is 500 feet, all are 600 or greater and have had hydro fractures on all. I think two of them will eventually fill but I have no idea for sure. The driller told me they were about two GPM but after a month we pumped them dry. My psi tank is only 5 gal and I read that you recommend a large tank to accomodate the slow recharge. I think the route I would like to take is to set up my shallow well. The one I mentioned in the other mail, and pump down my drilled well till it loses suction then let it recharge and see how long it takes to fill ?? My shallow well is down the road on another piece of property about 500 yards down the street. It is 18' deep 36" dia and holds 5 feet of water. If pumped down to 6", it will recharge 3 feet in 1 hr. I can see water filling it as soon as I stop pumping so I think it will be ok. ??? How about you??

Dean


----- Original Message -----
From: Fred Dungan
To: "Martin, Michael D MMC(SS) (CSS16 N405)"
Sent: Tuesday, April 29, 2003 10:43 PM
Subject: Wells

Dean,

My father was a career Navy man, a Chief Quartermaster who served in World War II and Korea. His last ship was a heavy cruiser, the USS Helena. I was born in the US Naval Hospital at 7th and Bellflower in Long Beach, California. Our base housing was a big quonset hut, which sure beat the little trailer without a bathroom that we lived in before then.

I'll tell you a secret, but first you must promise to spread it far and wide. Drillers have an enormous investment in their rigs, some of which cost upwards of a quarter of a million dollars. Their crews make good money. In order to recoup his investment and justify what he charges the customer, it is to a driller's advantage to go as deep as possible, often bypassing better aquifers than the one he will eventually tap into halfway to Hades. And that deeper than deep well will cost you even more in the long run because it will require more electricity to raise the groundwater to the surface.

More and more property owners are turning to do-it-yourself water well alternatives. That is what me and my website, Water Well Helpline, are all about. I show people like yourself how they can do the job for less. In your case, if you would prefer not to go to the expense of purchasing a larger pressure tank, you can accomplish pretty much the same thing by enlarging the diameter of your well. The larger the diameter, the more water it holds. Needless to say, an underground reservoir is less cumbersome and a heck of a lot cheaper than purchasing a pressure tank. However, I should mention that the pressure tank does have an advantage in that it takes some of the strain off your pump and thereby makes it last longer.

Sincerely,

Fred Dungan


From: Thomas Tidwell
To: fdungan@fdungan.com
Sent: Thursday, June 20, 2002 8:38 AM
Subject: OLD WELL

DEAR FRED,

I LOVED THE WEB SITE AND WAS GLAD TO HAVE SOMEONE TO ASK A FEW QUESTIONS TO. I HAVE AN OLD WELL. APPROX 20 FT DEEP AND WATER AT 17' OR SO. THE WELL HAS A THIN WALL 4" PVC IN IT NOW.  SO I PUT IN A JET PUMP WITH 1.5" PVC DOWN LINE AND IT WOULDN'T BRING ANYTHING UP.  AS IT TURNS OUT THE 4' PVC IN THE WELL IS BROKEN UP AT THE BOTTOM AND JUNK IS IN IT.  A FRIEND SAID TO PUT AN AIR LINE IN THE WELL AND "BLOW " THE WELL. HE SAID THE AIR WOULD CREATE AN AIR POCKET THAT WHEN IT BURST WOULD SHOOT MUD AND SMALL JUNK OUT THE WELL AND, AFTER A DAYS OR SO, CREATE A SAND CAVITY.

2 QUESTIONS.

1, WILL THE COMPRESSED AIR WORK TO MAKE A CAVITY?

2, IF I PUT A SMALLER (3") PVC PIPE INSIDE THE OLD 4" FOR A NEW WALL, OR DOES IT HAVE TO BE SEALED OFF FROM THE OLD WELL WALL TO WORK.

THOMAS TIDWELL

SOUTH EAST TEXAS GULF

Thomas,

Any job worth doing is worth doing right.  Your well has muck in the bottom.  Remember, this is your drinking water we are talking about.  If there is a company nearby that pumps out septic tanks, ask them if they also do wells.  Otherwise you will have to do it the hard way.  Get rid of that 4 inch thinwall and replace it with either Schedule 40 or Schedule 80 PVC.

The compressed air idea might work.  Then again, it might not.  Your friend may well be a genius, but in this case genius could be a liability.

Best regards,

Fred Dungan


From: Randall Reihing
To: fdungan@fdungan.com
Sent: Friday, August 16, 2002 10:20 AM
Subject: Point Well

Dear Mr. Dungan:

Researching information on point wells because mine failed last night, I came across your name. Hoping you might have time for a reply. My wife and two daughters will appreciate it almost as much as I will. Women who cannot shower are almost as frustrated as those with insufficient closet space. Unfortunately I now have all three. No water, not enough closet space, and three frustrated and upset women. Only the dog is sympathetic. He could care less and is currently a better friend than I knew.

Every August, for the past four years, our 1979 point well seems to run out of water and we lose the pump prime. If we are not home, the pump runs until it fails. We thought we had a defective check valve or something related to that, so last year the entire system, above ground, was rebuilt with new pipes, new check valve and a new Wayne 3/4 hp motor and associated jet pump. It worked perfectly flowing some 2-3 gpm at 25-40 psi for the past year.

Last night, the pump turned on. For some reason the water pressure had dropped and never recovered.

We will need a new pump again. I am now wondering if the point is defective. I opened the top of the 1-1/4" casing and dropped a weighted string down. Hit water at about 8'. The string reached 15' before it stopped moving.

I have had several people at our small town's hardware tell me the 1979 point is most likely corroded and to just "wash-in" a new point. "It's simple" they say—"just takes a few hours". But the local well driller wants $2500.00 to do that. And $4500.00 for a drilled well. So, I am considering replacing the point myself. But, I have not been able to locate detailed information on step-by-step instructions for "washing in" a point well. Can you help?

Hoping you might have time to reply.

Sincerely,

Randall Reihing


From: Fred Dungan
To: Randall Reihing
Sent: Friday, August 16, 2002 6:47 PM
Subject: Re: Point Well

Randall,

At least you still HAVE a woman. Mine left 20 years ago and I have yet to find a replacement. Out of desperation, I have become one of those people who talk to dogs. No wonder the neighbors look at me funny.

It sounds like you have a bad case of seasonal fluctuation. The symptoms are that the water table drops every August and leaves you with no water. Yes, there is water in the pipe, however, the recovery rate (how long it takes the pipe to refill) isn't worth a plug nickel. Ordinarily, I'd tell you to take the pump off, screw on a cap, and give it a couple of whacks with a sledgehammer to drive it a few feet deeper. However, considering how long it has been in the ground, that is probably not a good idea. The alternative, of course, is to put in a new well. But that, too, doesn't make much sense, considering that the well you already have works most of the time. So here is what I recommend: put down a new well next to the old well and go at least seven feet deeper (but not deeper than 25 feet because that is the limit for suction pumps) and hook both wells up in series (join the pipes at the top and use one pump to pump both wells). Put in a ball valve that will allow you to shut off the old well at times when it isn't producing. If this doesn't make the women happy, point them in the direction of my place. After a day with me, they will learn that there are worse things in life than having to do without a shower.

Sincerely,

Fred Dungan


---- Original Message -----
From: rkwood@mwt.net
To: fdungan@fdungan.com
Sent: Saturday, May 29, 2004 6:27 AM
Subject: Simple well question

How do you know for sure that you have driven your well deep enough? I was told to drive it in 10ft, fill with water and if it stays go farther, keep going till water no longer stays in pipe. Any validity to that? Going to attempt to install a sand point soon. Thanks for any help. I have looked at your website and it's very informative (printed all 38 pages), but found no info on this.

Ryan Woodhouse


From: "Fred Dungan" fdungan@fdungan.com
To: rkwood@mwt.net
Subject: Re: Simple well question
Date: Sat, 29 May 2004 22:30:40 -0700

Ryan,

I wasn't aware that my website had grown to 38 pages until I read your message. Back in 1997, when I started, it wasn't more than a page or two. Sometimes I worry that it has become too complicated. When I was in the Army, they used to tell us KISS (which is an acronym for Keep It Simple, Stupid). The more complicated I make it, the more likely it will confuse people instead of helping them.

When I was a little boy, my mother (who barely finished elementary school) told me that "water always seeks its own level." What she meant by it was that when two seperate bodies of water connect, it won't be long until they are both at the same level even if one was a lot higher than the other. If you fill the pipe with water, it is going to drain down to the aquifer's level shortly after the well screen encounters the aquifer. So, yes, the statement is valid. There are also a number of other good reasons for filling it up with water, the chief of which is that the water serves as a lubricant for the point—less friction makes less work.

Sincerely,

Fred Dungan


----- Original Message -----
From: Chad Altman
To: fdungan@fdungan.com
Sent: Sunday, October 09, 2005 7:17 PM
Subject: Already Driven Well Another Problem

Fred,

Thank you for your site it is very informative. But I do have one question pertaining to an already driven well. This is what I have a 3” casing with 1 Ό” suction (drop) pipe. Somehow, some way the suction pipe has broken about 7 feet down inside the casing, how or what is the easiest way to remove my suction pipe? Note** The total length Is about 60 Ft. of suction pipe. Thank you for any help you can give me on this.

Chad Altman
Panama City, Fl.


From: Fred Dungan
To: chada@knology.net
Sent: Sunday, October 09, 2005 7:31 PM
Subject: Re: Already Driven Well Another Problem

Chad,

I take it we are talking about Schedule 40 galvanized pipe because if it was PVC you probably would have gotten it out by now. Seven feet isn't all that far down. Buy a 10 foot length of 1 ½ inch galvanized pipe and try to slip it over the top of the 1 ¼ inch pipe (practice doing this above ground with a small length of 1 ¼ inch galvanized before you try doing it in the well). Hammer the 1 ½ inch down as far as it will go (use a sledge hammer). Hopefully it will jam onto the 1 ¼ inch and you will be able to lift it out. However 60 feet of steel pipe will be quite heavy and I suggest you use a tripod or a hoist to do it. If this doesn't work, dig yourself a 7 foot deep pit around the pipe so you can get to it.

Sincerely,

Fred Dungan


PHIL AND TRICIA WRITE ABOUT THEIR SANDSUCKER WELL


-----Original Message-----
From: Phil & Tricia DeVries phildevries@hotmail.com
To: fdungan@fdungan.com Date: Thursday, May 13, 1999 10:02 PM
Subject: Driving a Well

Fred,

Thank you for your home page section on driving your own well.  I searched the internet for info when I was interested in looking into it and your page was the only one out there on the subject!  I really used your encouragement to get me started.  I ended up doing what is called “Sand Sucking&rdquo my well to drive it down.  I started with an auger style post hole digger to get me down to the water table (only about 20 feet here in Spring Lake).  Then the hole keeps falling in on itself when you finally hit water.  At this point you send a 3" PVC pipe down and begin "sand sucking" your 3" pipe down.  The sand sucker is a pipe that just fits into the 3" pipe.  It is open at both ends with an upside down funnel at the bottom.  There is a steel ball in the pipe (the pipe is about 2 1/2 feet long), that lets the sand and gravel in, but the water bubbles out the top.  You keep lifting the sand sucker up and down till it gets some sand in it and then pull it up and empty it out.  In the meantime, the 3" pipe tends to settle down farther and farther till you are as far below the water table as you want to go.  I hit water at about 20 feet and sucked my 3" pipe down to 29'.  At this point, I placed a 2" PVC pipe with a 5' PVC point attached into the 3" pipe and attached sections of 2" pipe until the point was resting at the bottom of the well.  Then I pulled the 3" pipe up to expose the 2" PVC point (5 feet or more).  Then you cut off the 3" and 2" pipe at the surface and attach a pitcher pump to clean out the well.

I am planning to use our well for watering our lawn because I do not want to pay the city for its water.  I purchased a 1 1/2 horse jet pump.  With a 1 1/2" pipe as output from the jet pump I am getting 60 gallons of water per minute!  This is PLENTY of water for my little 100' X 150' lot.  I am laying the automatic sprinklers out this weekend.

I have attached a picture of the well in progress.  I am the one in the flannel shirt, the other is my buddy Skip.

In the picture of my wife and Skip you can see Skip holding the sand sucker.  The 3" pipe is sticking up quite a ways, too far in fact to work the sand sucker.  We ended up cutting it off to a managable 5' sections so we could work it from the ground rather that on the ladder.  Our dog Mango (a Jack Russell Terrier), is also in the picture.  She is going to love the sprinklers as she loves chasing water...

Thanks again for your information,

Phil & Tricia DeVries
Spring Lake, MIsand sucker 1     sand sucker 2     manifold
The well has a flow rate of 60 gallons per minute and Phil says he can operate twice as many sprinklers at one time as his neighbors who depend upon the municipal system. If you have further questions, you can reach Phil and Tricia by clicking on the address at the top of the message. They live in Spring Lake, MI.


BUILDING A SAND SUCKER WELL—QUESTIONS AND ANSWERS


----- Original Message -----
From: Phil & Tricia DeVries phildevries@hotmail.com
To: A Brent Cook <brent1@InfoAve.Net>
Cc: Fred Dungan <fdungan@fdungan.com>
Sent: Sunday, October 10, 1999 12:34 PM
Subject: RE: Question

Phil,

I came across your article about your Sand Sucker well.  I am obviously researching the possibilities of putting in a well myself.  Unlike you I am in Georgia.  There are wells everywhere here so I am certain I will find water.  Your article is very short and raises a couple questions I hope you can answer for me.

1. Did you just auger down until you found wet sand?

Yes.  The water table here is at 20 feet.  I augered and kept adding 5' sections onto my auger until I hit the wet sand.

2. You mentioned “At this point, I placed a 2" PVC pipe with a 5' PVC point attached into the 3" pipe and attached sections of 2" pipe until the point was resting at the bottom of the well.”  Could you give me some more info on this?  (i.e. is the 2" pipe glued into the 3" or just what?)

No, the 3" PVC pipe is what I worked into the ground (down to 29') with the sand sucker.  First I augered a hole down to 20'.  Then I placed the 3" pipe into the hole (I pieced together two 10' sections and one 5' section to begin with).  Then I sand sucked the 3" pipe down to 29' (I added
one more 5' section when the end of the pipe got down to ground level).  The sand sucker simply fills up with sand via the up-down motion you create by pulling it up and down by hand with a rope you have tied to it.  When it's full, you pull it up, empty it, and repeat...).  This allows the 3" pipe to 'jiggle' down, little by little until it is at the depth you desire (typically so the top of your point will be at least 4' to 5' below the water table)  Then I placed the the 2" pipe (with the 5' PVC point attached to the bottom of it) into the 3" pipe.  Now you have both pipes sitting in the hole.  They are not attached to each other in any way, simply one inside of the other with the 5' point at the bottom inside the 3" pipe.  The key is that you have to pull the 3" pipe up.  Pull it up 5' so that the 2" PVC point is fully exposed to the ground (and water).  Cut both pipes off at the top.  Cut the 3" pipe just about ground level, and cut the 2" pipe high enough above the ground so you can attach your pump to it.  The 3" pipe remains a part of your well, although it is not used for anything other
than a head start if you ever have to pull up the 2" pipe to service it.

3. Did you have to create a filter pack and if so what did you use (gravel, sand, a mixture...)?

No.  The soil here is made up of sand and gravel therefore no filter pack is necessary.

4. Where on the Internet did you find any additional information you used?  Things are still somewhat limited.

You are correct, info is limited!  I went to the local hardware store where the owner helped me along (he had a sand sucker that he let me borrow).  I was convinced I could do it based on Freds page (the page that has my info on it that you read).  If you have soil made up of sand/light gravel, then a sand sucker may work for you.  Otherwise you would probably be better off pounding down a steel point with 2" galvanized pipe.  You can still auger down a hole as far as you can; it will likely reduce the work of pounding quite a bit.  If you would like info on a sand sucker, I can give you the name of the hardware store that I went to in MI.  He may be able to help you.

Thanks for any help you can offer.  A well will be great for my lawn and for emergency water in case there is an outage.  Yes, hurricane Floyd could have hurt us bad!


Brent Cook
Hinesville, Ga.


WARNING:  PVC drivepoints can shatter when hit with a hammer.

PVC Drivepoint  Tools
LEFT PHOTO:  PVC drivepoint   RIGHT PHOTO:  drivepoint, sand sucker, auger, and auger extension


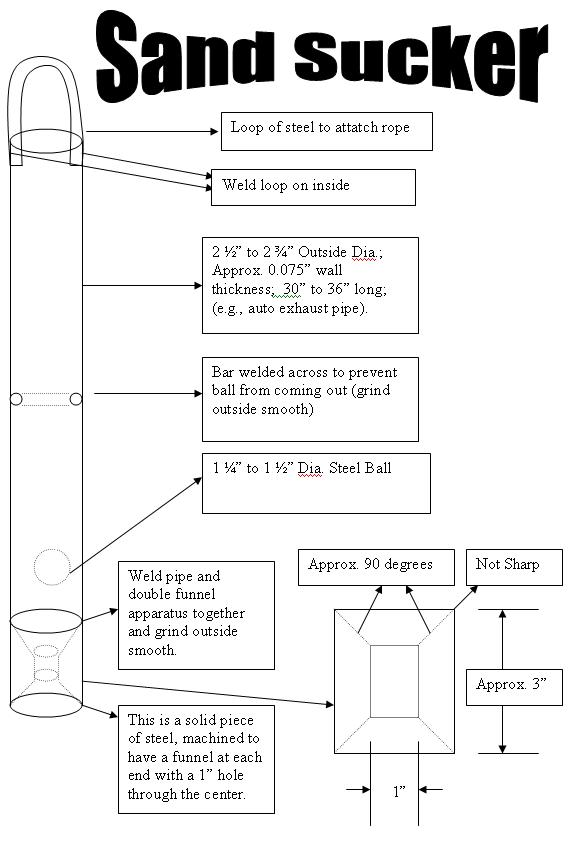
Fascinating isn't it? If you have access to a machine shop, you can build your own sandsucker by following Phil's diagram:


SANDSUCKER


Here it is again in a larger, more detailed format:
SANDSUCKER SCHEMATIC
This page last modified on October 24, 2011.